When developing a WebPart there are many ways to add your DLL to your site to test it.
- Manually copping the DLL to the GAC then do an iisreset or a pool recycle
- Use Visual Studio Extensions for SharePoint (that basically do a copy to GAC and an pool recycle)
- Copy the DLL to your Web Application \bin folder (no recycle nor iisreset needed, muUuuuuch faster)
In my opinion this last solution is the fastest way for developing WebParts. There are several prerequisites to enable this. Here is the step by step how to.
Create a new class library project in visual studio (or open your existing project).
I recommend signing your DLL now if you plan latter to install it in the GAC of the production farm.
If it’s a new project add a reference to System.Web and create a class like this one.
Open the project settings and go to the build tab. Change the output folder to map your “C:\Inetpub\wwwroot\wss\VirtualDirectories\XXXX\bin” (replace XXXX with the port of your Web Application).

You must know that by default the \bin folder has limited trust. To use SharePoint's API from an assembly running from that folder you must write Code Access Security (CAS) to allow your assembly. Or you can elevate the global trust level to "Full", this will include giving full trust to the \bin folder as well. (IMPORTANT: This is only for development purpose, reducing the trust level on the production environment is highly deprecated)
To do so follow these steps:
Open your “C:\Inetpub\wwwroot\wss\VirtualDirectories\XXXX\Web.conf” and find the trust tag, change the level to “Full”.
If the assembly's finality is to be in the bin folder write CAS policy to use SharePoint object model! If your assembly will end in the GAC in the final project don't bother with CAS (GAC has full trust).
In order to import WebParts that are in an assembly within the /bin folder you need to add this to your AssemblyInfo.cs
While your Web.conf is open you can add your assembly as safe control. Find the <SafeControls> tag, modify the following line to match your assembly’s strong name and add it before </SafeControls> closing tag. (You can use Reflector to retrieve the strong name of your assembly)
You might want to enable ASP.NET error messages. Find the SafeMode tag and change CallStack to true.
Then find customErrors tag and change mode to Off.
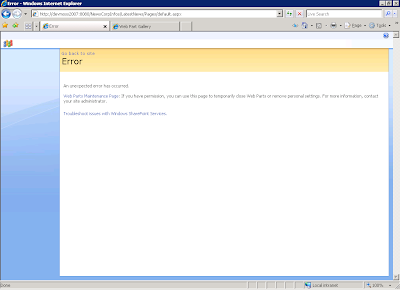
This will replace (obscure) error messages from

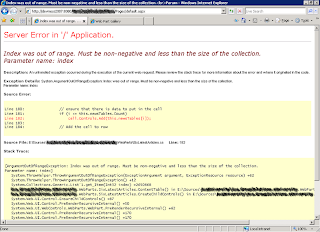
To

Once you’ve done all this open your site and go to “SiteSettings > WebParts” and populate the WebPart.
Then add your web part to any page you want.
Now you only need to build your project and hit the page again to see the changes without having to do a pool recycle or an iisreset that lasts forever.
NOTE: if the same assembly is placed in the GAC and in the bin folder, the Web Application will use the one from the GAC and ignore the one from the bin folder.
If this happens, uninstall the assembly from the GAC (in C:\WINDOWS\assembly) and do an iisreset to switch back to the assembly from the bin folder (this is required to remove the assembly pointing to the GAC from iis's cache).
- Manually copping the DLL to the GAC then do an iisreset or a pool recycle
- Use Visual Studio Extensions for SharePoint (that basically do a copy to GAC and an pool recycle)
- Copy the DLL to your Web Application \bin folder (no recycle nor iisreset needed, muUuuuuch faster)
In my opinion this last solution is the fastest way for developing WebParts. There are several prerequisites to enable this. Here is the step by step how to.
Create a new class library project in visual studio (or open your existing project).
I recommend signing your DLL now if you plan latter to install it in the GAC of the production farm.
If it’s a new project add a reference to System.Web and create a class like this one.
using System;
using System.Web;
using System.Web.UI;
using System.Web.UI.WebControls;
using System.Web.UI.WebControls.WebParts;

namespace MyCompany.MyProject.MyWebParts
{
public class DemoWebPart : WebPart
{
protected override void CreateChildControls()
{
this.Controls.Add(new LiteralControl("This WebPart rulz !"));
}
}
}
Open the project settings and go to the build tab. Change the output folder to map your “C:\Inetpub\wwwroot\wss\VirtualDirectories\XXXX\bin” (replace XXXX with the port of your Web Application).

You must know that by default the \bin folder has limited trust. To use SharePoint's API from an assembly running from that folder you must write Code Access Security (CAS) to allow your assembly. Or you can elevate the global trust level to "Full", this will include giving full trust to the \bin folder as well. (IMPORTANT: This is only for development purpose, reducing the trust level on the production environment is highly deprecated)
To do so follow these steps:
Open your “C:\Inetpub\wwwroot\wss\VirtualDirectories\XXXX\Web.conf” and find the trust tag, change the level to “Full”.
If the assembly's finality is to be in the bin folder write CAS policy to use SharePoint object model! If your assembly will end in the GAC in the final project don't bother with CAS (GAC has full trust).
<trust level="Full" originUrl="" />
In order to import WebParts that are in an assembly within the /bin folder you need to add this to your AssemblyInfo.cs
using System.Security;
...
[assembly: AllowPartiallyTrustedCallersAttribute()]
While your Web.conf is open you can add your assembly as safe control. Find the <SafeControls> tag, modify the following line to match your assembly’s strong name and add it before </SafeControls> closing tag. (You can use Reflector to retrieve the strong name of your assembly)
<SafeControl Assembly="MyCompany.MyProject.MyWebParts, Version=1.0.0.0, Culture=neutral, PublicKeyToken=65475030cb4253e3" Namespace=" MyCompany.MyProject.MyWebParts " TypeName="*" Safe="True" />
You might want to enable ASP.NET error messages. Find the SafeMode tag and change CallStack to true.
<SafeMode MaxControls="200" CallStack="true" DirectFileDependencies="10" TotalFileDependencies="50" AllowPageLevelTrace="false">
Then find customErrors tag and change mode to Off.
<customErrors mode="Off" />
This will replace (obscure) error messages from

To

Once you’ve done all this open your site and go to “SiteSettings > WebParts” and populate the WebPart.
Then add your web part to any page you want.
Now you only need to build your project and hit the page again to see the changes without having to do a pool recycle or an iisreset that lasts forever.
NOTE: if the same assembly is placed in the GAC and in the bin folder, the Web Application will use the one from the GAC and ignore the one from the bin folder.
If this happens, uninstall the assembly from the GAC (in C:\WINDOWS\assembly) and do an iisreset to switch back to the assembly from the bin folder (this is required to remove the assembly pointing to the GAC from iis's cache).
Comments